If you’re running a WordPress website and expect high traffic or want to ensure seamless performance even under pressure, setting up a 3 node WordPress cluster is an excellent solution. This configuration not only increases reliability but also enhances the scalability of your site, making it resilient to failures and spikes in traffic. Here’s everything you need to know about setting up a 3-node WordPress cluster that will ensure top-notch performance for your website.
What is a 3 Node WordPress Cluster?
A 3-node WordPress cluster is a setup where your WordPress website runs on three different servers, each playing a specific role. The goal is to ensure your site is available and performs optimally even when one or more servers face issues. Here’s how the nodes in the cluster work:
- Web Server Node: This node handles the HTTP requests, delivering your website content to visitors.
- Database Node: The database node holds all the content and user data of your WordPress site. It is essential for WordPress’s dynamic content, like posts, comments, and user accounts.
- File Storage Node: This stores media files like images, videos, and downloadable content that your website serves to users.
With a 3-node WordPress cluster, if one node fails, the other two can continue operating, minimizing downtime and maintaining your site’s availability.
Why Use a 3 Node WordPress Cluster?
1. High Availability
One of the main reasons for setting up a 3-node WordPress cluster is ensuring high availability. With multiple servers running simultaneously, even if one node goes down, the others can still handle requests and maintain your website’s performance. This is particularly crucial for businesses and blogs that cannot afford any downtime.
2. Load Balancing
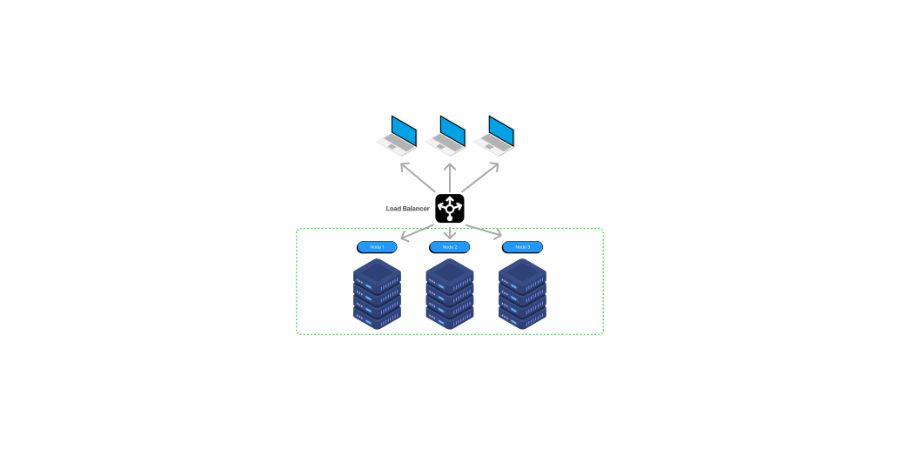
A 3-node cluster helps distribute the load effectively across the servers. When multiple users access your website at once, the web servers can balance the traffic load. Instead of overwhelming a single server, the traffic is split among the nodes, reducing the chances of server overload and boosting the overall site performance.
3. Scalability
As your website grows, you may need to scale up resources to handle more traffic. A 3-node WordPress cluster allows you to easily add more nodes or servers to accommodate this increase in traffic. The architecture is designed to grow with you, ensuring that your website remains fast and responsive even as its user base expands.
4. Improved Performance
By using multiple servers, each one can be optimized for a specific role, such as database handling or serving static files. This makes the overall system more efficient and results in faster website load times, improving the user experience.
5. Disaster Recovery
In a traditional single-server setup, if something goes wrong, the entire website can crash. In contrast, with a 3-node WordPress cluster, there’s redundancy built in. If one server fails, the others keep your site up and running, allowing for smoother recovery without affecting your visitors.
Best Practices for Maintaining a 3 Node WordPress Cluster
- Monitor Performance: Use tools like Nagios or Prometheus to track server health.
- Optimize Database Queries: Use caching plugins like WP Rocket or W3 Total Cache to reduce database load.
- Regular Updates: Ensure WordPress, plugins, and themes are always updated for security and performance.
- Test Failover: Simulate node failures to ensure the cluster handles issues without downtime.
- Secure the Cluster: Use SSL certificates, firewalls, and regular backups to protect data.
Must Read: CDNs in WordPress Geektech.uk
U
Setting Up a 3 Node WordPress Cluster

Step 1: Choose the Right Hosting Provider
Before you begin, choose a reliable cloud hosting provider like AWS, Google Cloud, or DigitalOcean. These platforms offer flexible virtual machines (VMs) that you can use to deploy your nodes. Ensure that your provider offers the ability to scale your resources as needed.
Step 2: Set Up the Web Server Nodes
The web server nodes are responsible for serving the WordPress site to users. You can set these up using Apache or Nginx, both popular web servers that support WordPress.
- Install the necessary software on each node, including the PHP runtime, Nginx or Apache, and WordPress itself.
- Configure the load balancer to distribute incoming requests evenly between the web server nodes.
- Use a reverse proxy setup to manage traffic between nodes.
Step 3: Set Up the Database Node
The database node stores all the dynamic content for your WordPress site, including posts, comments, and settings. To ensure consistency across your cluster, you can set up MySQL or MariaDB on the database node.
- Install and configure MySQL or MariaDB on the dedicated database server.
- Set up database replication so that changes to the database on one server are mirrored across others.
- Consider using Galera Cluster for high availability and automatic failover.
Step 4: Set Up the File Storage Node
The file storage node manages media files like images and videos. Since WordPress stores media in the wp-content/uploads directory, you need a shared storage solution for these files.
- Use NFS (Network File System) or a cloud-based object storage system like Amazon S3 for file storage.
- Configure the web server nodes to access the shared file system so that they can serve static content to users.
Step 5: Load Balancing and Traffic Distribution
To ensure that traffic is evenly distributed between your web server nodes, set up a load balancer. Common load balancers include HAProxy, NGINX, or the load balancers provided by cloud platforms.
- Set up your load balancer to distribute HTTP requests across all web server nodes.
- Make sure the load balancer is also aware of your health checks to ensure it only sends traffic to healthy nodes.
Step 6: Security and Backups
Security is a top priority when managing a WordPress cluster. Here are some best practices:
- Use SSL certificates to secure communication between the user and the server.
- Set up firewalls and limit access to only necessary ports.
- Configure automatic backups of the database and file storage so that in case of failure, you can easily restore your website.
Conclusion
Setting up a 3-node WordPress cluster provides many benefits, from enhanced performance to high availability and disaster recovery. It’s an excellent choice for websites that expect high traffic or want to ensure a smooth user experience even during peak times. By carefully setting up your nodes, using load balancing, and following best practices for security and maintenance, you can enjoy a reliable, scalable WordPress site that can handle anything thrown at it.
By implementing this robust architecture, your WordPress website will not only be secure but also fast and scalable, ready to grow with your audience and meet their demands seamlessly.
FAQs
Q: What is a 3 node WordPress cluster?
A: A 3-node WordPress cluster is a setup where WordPress runs on three different servers (web server, database server, and file storage server) to ensure better performance, reliability, and scalability.
Q: How does a 3 node WordPress cluster improve website performance?
A: It distributes the load across multiple servers, reducing the risk of server overload and improving page load speeds for users.
Q: Is a 3 node WordPress cluster suitable for small websites?
A: It’s ideal for websites with high traffic or those that require high availability. Small websites may not need such a setup.
Q: What are the benefits of using a load balancer in a 3 node WordPress cluster?
A: A load balancer ensures even distribution of traffic across servers, which helps prevent overloads and improves site speed.
Q: How can I ensure the security of my WordPress cluster?
A: Use SSL certificates, firewalls, and regular backups, and keep your WordPress site, plugins, and themes up to date for better security.
Up Next, Don’t Miss: What’s a Bold New Font Style Used in WordPress


